
4 in 1 Animated Photo Set
DERIVE for CREATORS
Don't BUY this one unless
you like the animated
picture below
No Refunds
Excellent derive tfor creators making
Wedding Photo Sets or other display photo sets

DERIVE for CREATORS
Ask your favorite creator to make an
LCD Animated Photo Picture Set for you today
A nice looking display of 4 favorite Photos or a 4 frame animation
Yes, You can take a .GIF file 'apart' and animate it here
I have the 4 Frame, 8 and 32 frame versions in my catalog
This set is wonderful. Ever seen those Animated
LCD Picture Frames that run from batteries?
You can control the Speed of changing 4 Photographs
See the Hints Below the Texture Template
This mesh works very well on a Wall or a floor.
When placed with the furniture tools,
it defaults to about 8 feet by 8 feet.
The reason for this is to allow people to
resize it DOWN to the size they want and
at the same time make the
quality of the images enhanced
![]() first in the Client Shop Window
first in the Client Shop Window
Many more choices are available.
More Choices HERE :
Need Assistance? Just drop me a PM and I will respond as soon as possible.
Creator's Notes
&
UV Maps Below

DarkAngel5
|
Weddings Music Ambiance |
Candlelight Dinner for Two |
Wedding Priest & Vows |
|||
 |
 |
 |
More Wedding Items
Creator's Notes & Tips:
Graphics!!!
I have used small sized graphics for LOW Kb to help reduce overall client crashing.
This also leaves you plenty of Kb upload room to add your artwork and still have a
light Kb weight product.
Please note, if your color combinations are not working, adjust the Vertex On or Off as needed.
You can also adjust the "Self Illumination". Experiment with these settings on the Material Table.
You may use any size graphic you wish. If you need more detail use a Larger Graphic 256x256 or 512x256, etc.
This project may use Mapped (below) and / or Standard graphics in a 128x128, 256x256 and up.
Look closely at my textures in the Create Mode to get an idea
Some textures are 'standard' except for any UV Mapped as in the given maps below. Change as many textures as you want.
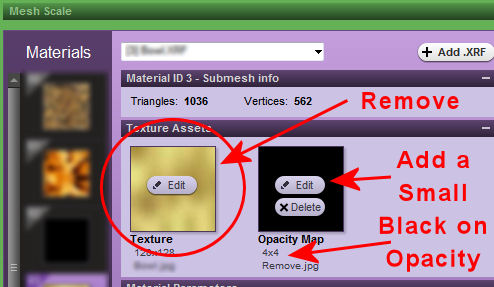
| Please Note: If you would like to remove a piece of the product, simply add a Small Solid Black (4x4px) material to the Opacity. |
 < Click > |
Can you use my textures on any of my products? YES!
Can you use my textures on other people's products? No.
Texture Materials:
Please look closely in the Create Mode at the Texture Materials
There you will see tiny "thumbnail icons" and can use these to get
an idea of what to use.
Material Template is below - Right Click and Save, then edit
The main material is 512 x 512. Within the main material there are 4 'Cells'
The 'Cells' are numbered 1 through 4. From top to bottom follow from left to right.
Cell 1 is Top Left. Cell 2 is Top Right, Cell 3 is Bottom Left Cell 4 is Bottom Right
THIS IS OF NO MATTER UNLESS YOU ARE MAKING AN ANIMATION 'FILM'
1) In Create Mode - (previewer is about the same) Open the product to Create a new Derive
You will notice the project is on the floor. It is Okay as it sticks to walls, ceilings and floors.
Grab a tool and stick it on the wall if you want to or Click the 'Birds Eye View' Your choice.
2) Notice the Picture Frame is about 8 feet by 8 feet Square. We have to work in squares for the
animation to work correctly. Any photo picture or animation used in IMVU will Look better when it is
Scaled down by the purchaser to a smaller more realistic size. That is why we made this one 8x8
feet. Tell them in your catalog. Use your artistic skill to crop your four pictures into squares and
resize them to fit into the frames OR you may go Frameless. Just cover the Frames on the project
.JPG file with your graphic editor. If you go Frameless, Just make your pictures 256x256. Hopefully
you are sizing DOWN to 256x256. You will loose a lot of detail in sizing UP. When you size them down
make sure you set your Graphic Editor's 'Resampling' on 'Weighted Average' for best results. If you
cant find that setting keep going. If you have used the Frames here, and alined everything carefully,
take a CLOSE look around the frame and fill in or correct anything overlapping the frame work. It
will show in the animation and look funny. :D Make sure your Four Piece Photo group is saved at
512x512.
3) Lets Plop it in and see what we have. You may need to edit the 2x2 and fix any eye catching
anomalies. Look at the Create mode editor and see the Tab for Meshes. Now look for Material 00.
It is the only one we need. See the listing on the Right the Top Material in named Material 00. This
is ours. Click on it to see + Sign to open up the the properties for Material 00. Press Edit on the
Texture and Browse to your saved File. Open it and then the big Yellow Apply Button at the Top of
Create Mode. Similar for Previewer. How is it looking the the View Window?
4) Hopefully we didn't get to playing to deep in the Create Mode editor before we followed these steps.
If you changed something under the Material 00 the heading of Texture Parameters or Texture
Animation it is ok - LOL - If you did, just close it all out. Open a fresh editor and start again by
plopping in your graphic again. LOOK under the Texture Animation Settings. The one we want to play
with is the 'FRAMES / CELL' this is the amount of 'Delay' each of the 4 cells will have before displaying
the next Cell. Starts 1 at Top Left - remember? Ok... Put in like 50 and you can see what it does. Now
put in like 100 in the Frames / Cell. Press the Apply Button in between each change and see. If you
*have* to play with the other numbers go ahead but is will get really messed up quick. LOL Do an
ALT+PRINT SCREEN and open your graphic editor and do a Paste as New Image to record the correct
setting.
You can make your own template or go Frameless. If you use this frame below the white graphic is 214 high and 222 wide. IDK why but it is centered and works great. If you play with the frame you will see it start "Flopping around" in the animation. Make your OWN... This is just a starting place.
NOW what? Edit your graphic as needed and try not to 'Overlap' the Picture Frame or leave gaps. Fill any gaps with surrounding colors or do a Frameless Animated Picture. Just Weddings? NAW, Do you favorite JOKE or happy faces from anyplace you want. Place hundreds in the catalog and watch the credits roll in :D Enjoy!
Pro Creators - Set Your SNAP to GRID and or SNAP to GUIDE. You can make other CELL Sizes and WhatNot Make a number grid to follow and see what is going on as the animation plays. Seems for some reason the Cell Width and Height have to be set to half of the actual cell size. same as the old Previewer.

NOTE: This is a PNG file you may use as a Layer if you wish
Transparency is set to Solid Black. If you have Black in your
Photos, lighten in a tiny bit and it should be non transparent
This mainly depends on your skills with your graphics program
SIMPLE WAY : Make a 4x4 picture arrangement like above. Start with 512x512
at at least 400dpi. Place your 4 pictues on your grid. LASTLY - Copy and Paste this on TOP
Right Click these and Save a Copy
QUESTION? -
What meshers show you these tricks? Should you support them more?
Please do.
There are many mesh providers on IMVU who do not care about you and teaching or trying to help. I am one who does! :D
Need Assistance? Just drop me a PM and I will PM you ASAP.
You may also find handy the " Creator's Helping Hands" It makes the avatar Stand Still for photos, etc.
ENJOY
Make Avatars Stand Still
Note: Graphics are Granted Use License for *this* project only. As always, if you have questions or need help, I am here.
Presenting the
Storybook Theater

presented by
Goldilocks & Lestat