Some chat-rooms are clean, polished, and pristine examples of everything you wish life was like. This item isn't for those rooms! When you want a bit more REAL in your Virtual Reality, try adding the Cockroach. This simple "Furniture" item can be added by itself, or freely copied dozens of times. You can even scale the bugs as big or small as you wish. Make your nasty chat room as bug-infested as your black little heart desires. Nothing says Real or Gritty as much as the humble Cockroach!
Like all Furniture items, use the Furniture Controls to copy, move, and rotate the Cockroach to feel your needs. You can copy them as many times you as like from this single purchase. You can also resize them, if you want tiny or massive Bugs. For best effect, use the Copy tool to make several copies and the Move tool to arrange them. Hold down Control or Shift when Moving the Cockroaches, to get the best placement.
Prefer Beetles to Cockroaches? How about some sound effects? Well then, buddy, start Deriving! Make your own version, and even sell it the catalog for a small markup over my original, and keep the extra profits for yourself! You can express yourself AND earn credits at the same time. How's that for a sweet deal? You'll need a full account on IMVU, as well as a copy of Previewer. You can find out more about Deriving on the IMVU's Education Center. Below is the template you'll need to get started (Right Click and Save As to your computer):
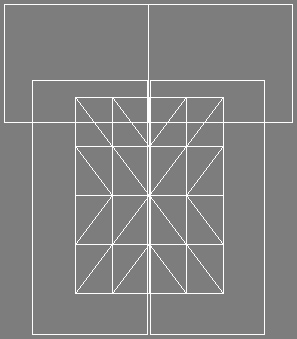
To get started, look over this image. This is the Wireframe structure of the Cockroach. This will give you an idea of how you can build your own Bug or Monster:
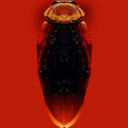
This is the texture map used for the Body of the Cockroach. If you only wish to change the color of the Cockroach, just manipulate these texture maps and you should have a new color bug in 5 minutes. As you can see, there's alot of unused space on either side of Body. If you wish to redefine the shape of the Cockroach, make sure the outline of the new shape is reflected in the Opacity layer:
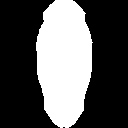
This is the Opacity layer for the Body of the Cockroach. This defines the shape of the bug. It's basically a White Silhouette of the Texture map above. Anything that is White is Solid, anything that is Black will be invisible. To make an Opacity layer, just make a copy of your image, make a selection of the outline of your new bug's Body, then paint everything inside the selection White, and the outside Black. Save that image under a new name, and your Opacity layer is done:
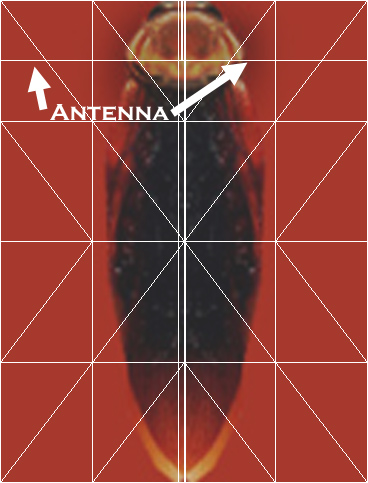
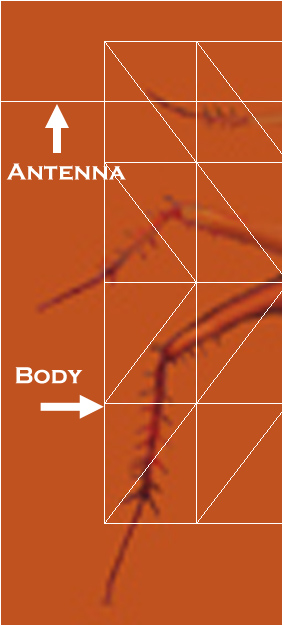
This is the Wireframe layout for the Cockroach. This shows you exactly how the image attaches to the model. I've included some markers to help you plan around the placement of the Antenna. Use this image if you plan on making a new Bug Body, so you can plan out your creature's form:
This Texture map for the Antenna. Just like the Body, you'll need to make a new Opacity layer if you plan on redefining the creature's form. If you're making a Spider, or something without Antenna, you can remove them by just painting this image and the Opacity layer, solid Black:

This is the Opacity layer for the Antenna. As I started above, if you want to remove the Antenna, just paint this image black. Otherwise use the Wireframe image below to plan your new shape:

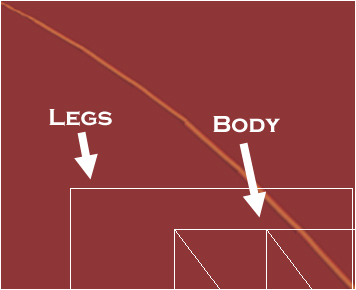
This is the Wireframe layout for the Antenna. I have markers that give you an idea of where the Legs and Body connect to this part of the model:
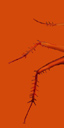
This is the Texture map for the Legs:
This is the Opacity Layer for the Legs:

This is the Wireframe layout for the Legs:
To add sound, I highly recommend you download and use Audacity. It's a free sound editing tool that can export out OGG sound files. OGG sound files compress down to less then 1/10th the file size of WAV files. SO USE OGG FILES!!! You can download it here:
http://audacity.sourceforge.net/
If you do add trigger-able sounds, make sure to avoid Looping sound effects. Looping sound effects have no stopping commands, so they just play and play. What sounds cool for 5 seconds, might just drive people INSANE if played for 20 minutes.