Feel like dancing in the rain? How about running around in a Thunderstorm? Well Crazy person, harness the power of nature with your very own the Personal Raincloud! This tiny little cumulus nimbus can be summoned up at a moment's notice to provide you shade, a shower, and a FULLY BLOW THUNDERSTORM! You can even use it for some quick, evil fun and rain on your friend's parade. Show everybody that the Life of the Party can be the biggest Drip!
(Note to Stinky People: Running the Rain isn't a substitute for taking an actual Shower)
Commands:
"Cloudy" - Summons the cloud for a little Shade.
"Rainy" - Summons the cloud for a brief Shower.
"Lightning" - Summons the cloud for a Lightning show.
"Stormy" - Brings down the full force this little cloud can muster!
"StormRight" - Rains on whom ever is just to the Right of you.
"StormLeft" - Rains on whom ever is just to the Left of you.
PLEASE NOTE: This object will Remain Hidden until you type in one of the above commands. When you put it on you won't see anything change on your avie because it's hidden. It's also an accessory that attaches to your avie's "RootNode". There's a limit to the number of things you can attach to any one point in the avie's body, so if you add something after adding the Personal Storm, there is a a chance you might remove it without noticing. So if the Storm isn't working, make sure to add it last to be sure it's actually attached.
Wish that cloud was snowing, instead of raining? Or how about some wicked sound effects to match the downpour? Well then, get Deriving buddy! Make your own version, and even sell it the catalog for a small markup over my original, and keep the extra profits for yourself! You can express yourself AND earn credits at the same time. How's that for a sweet deal? You'll need a full account on IMVU, as well as a copy of Previewer. You can find out more about Deriving on the IMVU's Education Center. Below is the template you'll need to get started (Right Click and Save As to your computer):
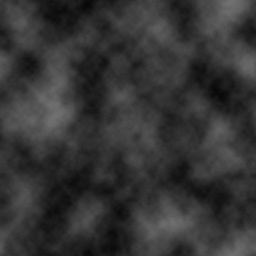
This is the Texture map for Cloud. It's a looping image, which means the image on the edges match the edges on the other side. This is important because the image moves and isn't fitted to the cloud. This won't be a problem if you just change the color of the cloud, but if you use a completely new pattern, you'll have to make sure the top, bottom, and both sides loop properly, or you'll see lines on the cloud as the image moves:
The Cloud has an Opacity layer, but I don't have a template here as the image is solid white. Should you wish for the cloud to be transparent, or have holes cut in it, you'll need a new Opacity layer. Anything that is white will be completely solid, and anything that is black will be invisible. Should you want the cloud to be semi-transparent, I would suggest a very light shade of gray. That way it'll be somewhat see-though, yet still very visible.
There is a Texture map for the Rain but I haven't included it here, as it is also completely white. Should you wish the rain to be a different color, like Toxic Green or Blood Red, you need only make a 512x512 image in one solid color that suits your needs. If you wish to do something more complicated, like Cats and Dogs, you'll need sprinkle your image on this texture, as well as making an appropriate Opacity layer that mimics the outline of the your objects. If you do add objects, make sure they are sparse as this image is replicated several times on the Rain object.
This is the Opacity layer for the Rain. Should you wish to make it rain harder, you need merely to add more "Drops" to this image. Should you wish it to rain something more complicated, like snowflakes or animals, you'll need to make sure this image is a Black and White Silohette of whatever is shown on the Texture map. White is solid and Black is invisible, so your image should look like a white shadow of your objects, against a black background. As this image is repeated several times, make sure whatever you add is done so sparsely, or your cloud will overwhelm the user with objects! Also make sure the dimensions of this image match those of the Rain's Texture map:
There is a Texture map for the Lightning, but again, it's another White image. Should you wish for Red or Blue lightning, you need only a solid image of that color, with the same dimensions of the Lightning's Opacity layer, shown below.
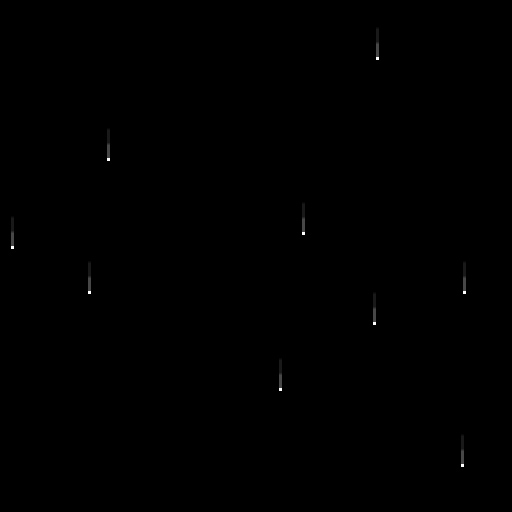
This is the Opacity layer for the Lightning. It's basically just a tiny white line on a black strip. This strip moves rapidly through a series of bolt objects, so the more white lines, the more Lightning is seen. If this image was all white, all of the bolts would be stuck on. For best effect, you should use very few, very thin, white lines, so each bolt is given a chance to be seen separately. It's probably best not to change this image at all:

To add sound, I highly recommend you download and use Audacity. It's a free sound editing tool that can export out OGG sound files. OGG sound files compress down to less then 1/10th the file size of WAV files. SO USE OGG FILES!!! You can download it here:
http://audacity.sourceforge.net/