
Don't like the color? Want sound? Think the eyes need to be on fire? Whatever your strange heart desires is possible thanks to Deriving! By deriving you can modify this guy into almost anything you want. You can even sell your creation in the catalog for slightly more then mine and keep the extra profits for yourself! You'll need a developer's account and a copy of Previewer. Check the IMVU Creator Center for more info on Deriving. Below are the templates you'll need to get started:
This is the Color texture for the Body. Use this if you only want to make small changes to the skin of the model:
This is a "Gray" template for the Body, in case you want to customize the color without first having to remove the colors I used:

This is the "Wireframe" for the Body. I've included this for the advanced users who wish to completely redesign the Body skin from scratch. This will show you the exact layout of every polygon in the model, so you know where every pixel is going:

Here is the Specular map (or Shine) for the Body. A Specular map is a gray image that defines how reflective an item should be. This only works in IMVU Desktop and IMVU Mobile, and has no effect in IMVU Classic (as of March.2024):

Here is the Normals map for the Body. This image defines the height effect of the Texture map. DO NOT alter this image directly. If you wish to make your own custom Normal map, please look further below. This only works in IMVU Desktop and IMVU Mobile, and has no effect in IMVU Classic (as of March.2024):

When I make a Normal map for the Body, I start out with a grey version of my Texture map, with just the shadows and highlights. Consider the basic level of the surface to be 50% grey. Darken your image to drill down, and add white to build up. You can always get a basic Normal map just by making a copy of your basic texture and removing all color. This is what the Normal map looked like before altering:

This is the Color texture for the Crest and Teeth:

This is the Opacity for the Crest and Teeth. Anything that is black is invisible, and anything that is white is visible. You can make them transparent by using shades of gray. You can alter the shape of both the Crest and Teeth by changing the shape of the white form, but make sure it lines up with your Color texture, or it won't turn out right:

This is a Gray texture for the Crest and Teeth:

This is the Wireframe for the Crest and Teeth:

The Specular map for the Crest and Teeth:

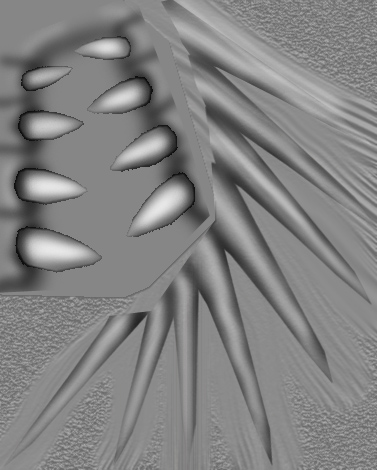
This is the Normal map for the Crest and Teeth:

This is the preprocessed Normal map for the Chest and Teeth:
This is the Color Texture for the Eyeball itself. Because of a small oversight, the Eyeball does not go all the way out to the edges of the texture, only the center most area is used:

This is the Wireframe for the Eye. Here you can see the oversight where I wasted some texture detail. Only a majority of the center is used, not the edges:

The Specular map for the Eye:

This is the Normal map for the Eye:

This is the preprocessed Normal map for the Eye:

To add sound, I highly recommend you download and use Audacity. It's a free sound editing tool that can export out OGG sound files. OGG sound files compress down to less then 1/10th the file size of WAV files. SO USE OGG FILES!!! You can download it here:
https://sourceforge.net/projects/audacity