Head sign tutorial
256x256 Pixel size, SMALL VERSION
THIS IS MADE FOR DEVELOPING PURPOSES!! Located under male inventory. (Works for both male and female) Female version.
This product is made as a guide to help you create your own simple headsign.
I have a collection of different size derivable headsigns, so you will easy find a headsign that suits your needs. However, if you need a custom size for a headsign, I can make one for you with no extra charge. (If I have time)
My most popular mesh for headsigns is the medium size one using a 512x256 pixel texture. This is the mesh I would suggest for making a text headsign, and this is the one used for this guide.


To become a developer:
1. new creators need to be vip to sign up to the creator program
2. you need some real credits. (Promo credits does not work)
To make a headsign you need:
1. to pick the derivable headsign (that suits your needs).
2. to create two images (texture and opacity).
3. to apply texture and opacity to the headsign (using create mode in IMVU)
4. to submit your headsign to the catalog.
My example shows how to make a black text headsign "Kiss meh!!" with a small red heart as a dot over i.

Part 1: Pick a derivable headsign.
I will derive from the medium size 512x256 pixel headsign. Most developers use this one because of its universal size. If you are not sure which size to derive from I suggest you use this one.
Part 2: Creating texture and opacity files.
You need to make two images (e.g. .jpg) the first image defines the "colors" of the headsign (this one is called TEXTURE), the second defines what parts of the texture should be visible (this one is called OPACITY).
Understanding textures and opacity can be a little tricky. When you have a look at the the examples I made, it should be a little easier to understand.
Opacity works as a filter. It removes parts of the texture.
Everything that is black in the opacity will be hidden on the corresponding parts of the texture.
Everything that is white in the opacity will be visible on the corresponding parts of the texture.
Confusing huh!! :)
Look at the Opacity file below. It is a black image with white text.
Then look at the texture file below that. Its a black image with a little red part.
Now imagine opacity on top of texture. The black parts in the opacity remove those parts of texture that will not be seen. And the result will be the headsign we are making.
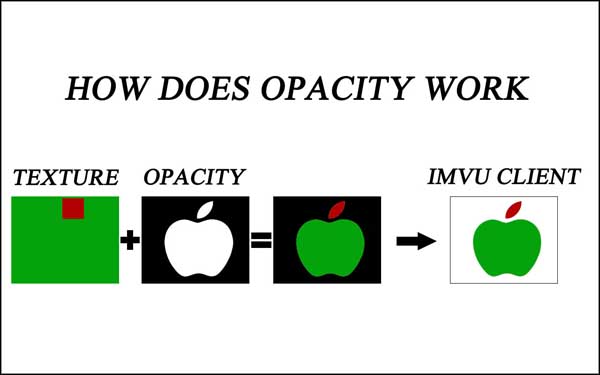
So to make a simple text headsign you only need a black texture file and a black opacity file with white text.
To make the images you can use programs such as photoshop or gimp.
!ATTENTION! - !ACHTUNG! - !ATTENZIONE! - !ВНИМАНИЕ! - !AANDACHT!
Very very Important!! Both the texture file and opacity file must be exactly the same pixel size (e.g 512x256 pixels).
Opacity File 512x256

Texture File 512x256

Part 3: Applying the files.
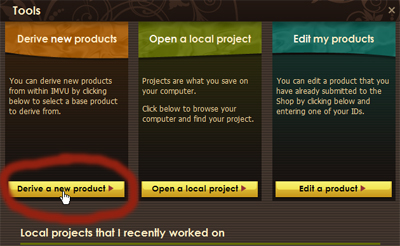
When you have the texture and opacity ready it's time to put our files into imvu. Sign in to IMVU and choose create mode. Press "Derive a new product". See images below.

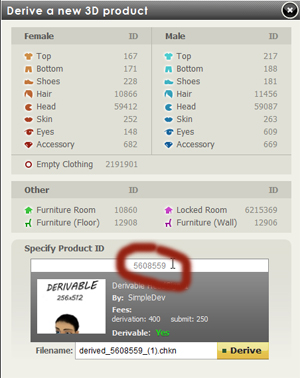
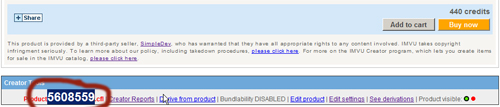
We need to specify the product ID for the derivable headsign we are going to use. The ID can be located at the very bottom of the product page for the product you wish to derive from. You will see the number in red. Look at the pictures below. Use that number (e.g. 5608559) and press "Derive".
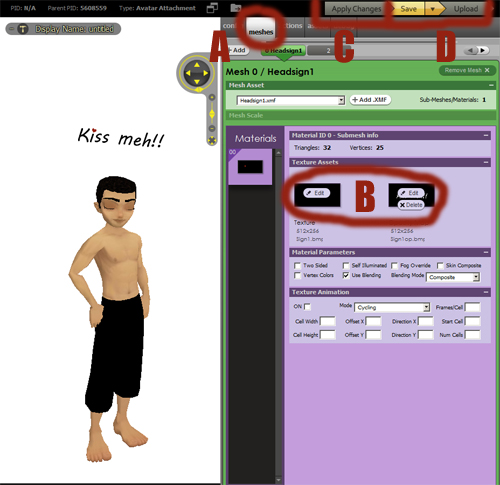
Once your finish loading the product you can replace the already existing files with your own (or those from this guide).
Simply follow the steps to replace them and see the result. Compare with picture below.
A: Make sure you are working in the correct tab "meshes" it should look like the picture below.
B: Replace existing files with your files. Just press the two edit buttons, and find your files on your computer.
C: Apply changes. Now you can see how your headsign looks like in the window on the left.
D: When you are happy with your result press Save and Upload.
Part 4: Submitting the product.
The final step is to submit your product to the catalog so it can be used. You do this by filling in the form that appears after you press submit in the client. Worth mentioning is that you can edit the details in this form later if you want.
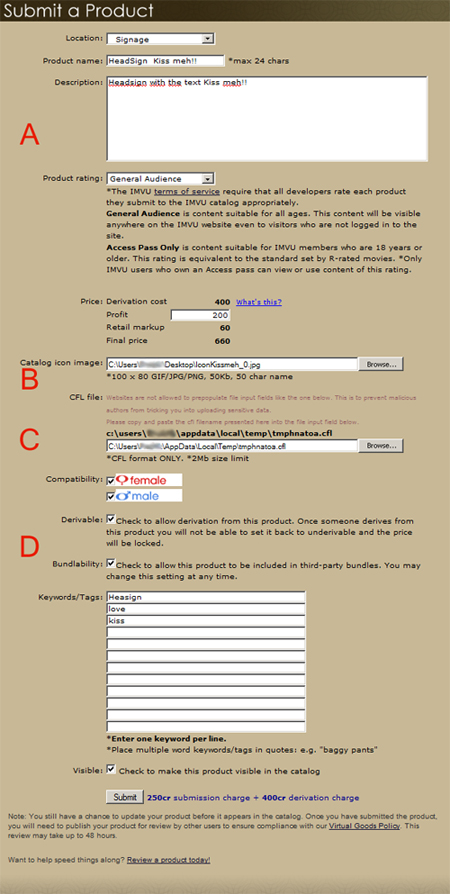 A: No need to change location. Name the product and write a simple description in the description box. Set a price to your product.
B: You need an icon image to use for your product and unfortunately it must have the correct size (100x80 pixels). If you don't have your own icon feel free to use one of the two I made for this guide. Just drag the icon you need to your desktop and then submit it to IMVU by pressing the browse button at B.


C: To upload your product (CFL file) copy the link over the input field. And paste the link into the white field, as described in the form.
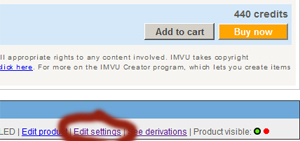
D: You can keep settings here as they are. Make sure Visible is marked if you want your headsign to be available for others to buy. If it is unmarked you can still use the headsign but it will not be available in the IMVU shop.
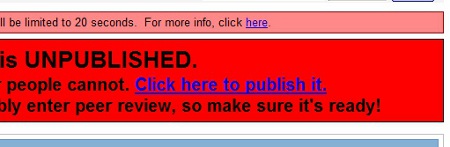
Finally press submit and don't forget to publish so other users can see your new headsign.
Good luck creating. :)
I will be happy to answer any questions. Send me messages if you need help.
Thank you for reading my tutorial.
Headsign sign head over overhead signage derivable derive creator tutorial tutorials guide instruction instructions help 256 512 text