Window Display Product Link. Great for Outfit Bundles and more...
!!! See the Video !!!

  LestatDeLioncourtBanner500x150


Make it work HELP is toward the bottom of this page. 

 Product Display Information Plaque
with
Flash Product Linker


This product is designed to work with the
Small Business Product Showroom
click it


~ However ~

This is also a generic product linker that can be used to take prospective customers
to your Product or to the Catalog Area you desire. It will offer the customer a
visual menu in the Chat Client and they may have options to send you a PM,
Visit your Homepage or Catalog and a specific product or a searched
area of your catalog.


See the full Showroom Here


All of my Merchant Creator
"Marketing Tools"
are located
Here
:

click it

 first in the Client Shop Window

More Choices  HERE :

Need Assistance?  Just drop me a PM and I will respond as soon as possible.


Creator's Notes
&

UV Maps Below


Contact Me for the Reward

 Weddings Music Ambiance 

 Candlelight Dinner for Two 

 Wedding Priest & Vows 


More Wedding Items


Creator's Notes & Tips:

Graphics!!!

I have used small sized graphics for the excellently LOW Kb to help reduce overall client crashing.
This also leaves you plenty of Kb Room to add your wonderful artwork and still have a light weight product.


Please note, if your color combinations are not working, adjust the Vertex On or Off as needed.
You can also adjust the "Self Illumination". Experiment with these settings.

You may use any size graphic you wish. If you need more detail use a Larger Graphic 256x256 or 512x256, etc.  This

project may use Mapped (below) and / or Standard graphics in a 128x128 (low Res/Kb), 256x256 (normal Res/Kb) and up to 512x512 (High Res/Kb) Look closely at my "starter" textures in the Create Mode to get an idea of their layout, sizes, more... Experiment!


Can you use my textures on any of my products? YES!
Can you use my textures on other people's products? No.


Material Textures &
 Material Opacity - 
 Please look closely in the Create Mode for my material textures. This project uses simple textures and
no UV Maps.Please,  k
eep in mind, your graphics dimensions can be larger or smaller than mine.


~ OMG! This looks complicated!
LOL Not really, just follow one step at a time
  ~

 
Flash "How To"

~ We are making the card3.xml file for our product linker ~

This is the 'magic' that makes it work for you!

Are you an Advanced User?
Some customizing information for the  is listed below for your reference.
 
_________
This looks and sounds harder than it really is!  More Help is below
We are making the
card3.xml file for our product linker
 
Step 1 

Copy & Paste the information listed in the below box into Wordpad or Notepad.
These come with Windows in the Programs 'Accessory' Listing. If you do not know
how to do this, Google "
How To Copy and Paste Text"


<?xml version="1.01" encoding="utf-8"?>
<card>
 <cardpic>card3.png</cardpic>
 <cardType><![CDATA[YourName]]></cardType>
 <lTitle1><![CDATA[Product<br>Name]]></lTitle1>
 <img>https://userimages-akm.imvu.com/catalog/avatars/Lestat.jpg</img>
 <sTitle1><![CDATA[Something for Everyone]]></sTitle1>
 <sTitle2><![CDATA[Professional Products & Derivable Mesh]]></sTitle2>
 <link1text><![CDATA[Lestat De Lioncourt]]></link1text>
 <link1>https://www.imvu.com/shop/web_search.php?manufacturers_id=42153530</link1>
 <link2text>Visit My Homepage</link2text>
 <link2>https://avatars.imvu.com/LestatDeLioncourt</link2>
 <link3>https://www.imvu.com/catalog/web_send_message_widget.php?recipient_id=42153530</link3>

</card>
 

Step 2  For ease of reference, the yellow parts are the places you can edit for your project.

Do not change anything else. The most common mistake is deleting one of the "Brackets"
They look like these... 
[   ]  be careful not to delete one of them. If it doesn't work in the
Create Mode when we are done, you did something wrong. Simply, grab the above text
again and start over with a clean copy.

Oh,  the places to edit won't show as yellow in the Notepad or Wordpad. This is okay.
The Yellow Coloring shown above, is for
reference only.
 

Look closely in your WordPad for the area with the text shown below. 

     <?xml version="1.0" encoding="utf-8"?>
     <card>
     <cardpic>
card3.png</cardpic> 

The card3.png show above is for the Background shown in the popup window when the
avatar steps on the yellow dot. You may simply leave it like it is or make your own.
To change it, you will need to save a 350x228 .png file named card3.png in the
Projects Folder.  If  you name your background something else, change this setting above
to the correct filename. Most just save theirs as card3.png. Not
card3.jpg Not
Card3.png but exactly card3.png and it must be saved as a .png file. Confused? Skip this step and use mine.


Look closely in your WordPad for the area with the text shown below. 

     <cardType><![CDATA[YourName]]></cardType>

Carefully remove and replace only the characters YourName with the Your Text.
Characters are Limited so play with it in the client. Again - Change only the
yellow part.

  Look closely in your WordPad for the area with the text shown below.  

     <lTitle1><![CDATA[Product<br>Name]]></lTitle1>

Carefully remove and replace only the characters Product<br>Name
 with Your<br>Text or just use Your Text. Characters are Limited so play with it in the client. I would use the Main Shorter Name of the product.

If you are wondering about the <br> in between the words.

This makes it jump down a line for the second word. Look at mine in the Create Mode. Play with it by putting a
<br> in yours, More on testing in Create Mode in a minute. Just keep going for now.
 

      <img>https://userimages-akm.imvu.com/catalog/avatars/Lestat.jpg</img>

The above is the link to a graphic saved some place on the Internet. (not located on your computer)  Simply, place your own in PhotoBucket or TinyPic, etc. Direct Link Address in this setting.

An example would be place a 160x220 snapshot of the avatar in the outfit if using this for outfits.
You could also use your avatar display picture here if you like.

NOTE: Currently, there is a small issue with the Create Mode. If the photo does not change immediately, try uploading the linker, clear cache and see if the photo change has taken place.


     <sTitle1><![CDATA[PID: 29165905 ]]></sTitle1>
     <sTitle2><![CDATA[
Dragon Master Outfit]]></sTitle2>


Add some text that you like in these two sections. Type something short on the first part. On the second part, type in a short name for the Product. Type anything in here for testing because you will need to adjust this later in the create mode. Will will be editing this file again later for fine adjustment.

       <link1text><![CDATA[Click and Try on All]]></link1text>

The phrase Click and Try on All can be changed to anything you want but keep the length about the same or shorter. The example term is for an Outfit Bundle so my phrase "Click and Try on All" fits for me. Use similar text relates to your product linker's use.
      <link1>https://www.imvu.com/shop/product.php?products_id=29165905</link1>

This is the link to your Product or the example OutFit Bundle in the catalog. Go to your product page and copy the web address from your web browser and paste it in here. This is where the customer goes when they click on my example "Click and Try All" as in above.
 

     <link2text>Visit My Homepage</link2text>

You can modify this if you want to or leave it as is . This might be a good place to link to your homepage!  You may want to change the text to "Visit My Catalog" and use the link for your Catalog instead. Look below at the next item.


     <link2>https://avatars.imvu.com/LestatDeLioncourt</link2>

This is the actual link to the URL of my homepage. Change it whatever link you want.  Make it match the description we did in the last step.


    <link3>https://www.imvu.com/catalog/web_send_message_widget.php?recipient_id=42153530</link3>

This one is so people can instantly message you from the Flash Banner. The little "Red ?" question mark in the top right corner will let people message you if they have questions, etc. It has my link on it now but it is easily changed to your Private Message link.

How?  See the yellow 42153530 number on the end? Only change that number to your IMVU member number.

How do you find it? Easy. Go to your IMVU Catalog Pages. Now look at the Address Bar on your Browser. That last number there is your member number. Just copy the number at the end and paste it on the above. Replace with your number instead of mine.

Step 3:  Save The Customized Script File - Let's save your card3.xml file
 

Now that you have customized the script to your liking, it's time to save it. Go to
"File" at the top left, now click on "Save As". When saving in Microsoft WordPad
or Microsoft Notepad, be certain that you save with the file type "All Types" or
"Unicode" selected  (you don't want to save it as a .txt file, it won't work!)  and
make sure you type in the full filename  *exactly* as " card3.xml " Please note:

Card3.XML or card3.txt won't work. It must be named
card3.xml

- Go to "File" at the top left, now click on "Save As".
- Look for File Type and select "Unicode Text Document" wth the down arrow as shown.
- Notice it wants a File Name. Type in exactly "  card3.xml  " without the quotes.

- Save it someplace easy like the Desktop or someplace you can find it.

Note: The "File Type" to "Save As". Use "Uni-Code" or "All Files" either one will work.
It is very important to name the file exactly as shown below.

      Detailed Photo


After you have the correctly edited file and it is named correctly you will then 'Copy and Paste'
the file into the Projects Folder. We willget to this in a moment. We  need to also place a custom graphic in the projects folder if you decided to edit the
card3.png graphic file. So let's do this now.

Both files MUST be named exactly (including upper / lower case) as follows:

Correct Names for these two files are:

card3.xml   (.XML Instructions File)
card3.png  (graphics Background File)


This is my example of the Flash Banner Background. You can use this as a guide to make your own. Don't forget to save it as a .PNG File and name it card3.png  Please note: saving the file as a .jpg will not work. Naming it things like
Card3.png, CARD3.png or even Card3.PNG will not work either.

      https://userimages-akm.imvu.com/userdata/42/15/35/30/userpics/Snap_qpBf2fypgM1921856830.png
 

Step 4:

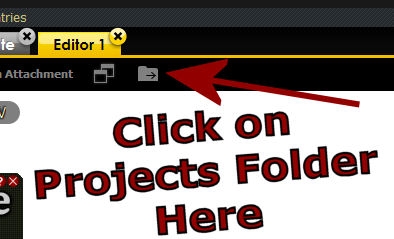
Add both File(s) toThe Projects Folder in Create Mode
This is where we place the card3.xml and the card3.png files
Open the projects folder in the Create Mode like the graphic below.

      Detailed Photo

All of the files associated with this project are stored in this folder. Using Windows Explorer,
find the file
card3.xml where you just saved it. Right Click then "Copy & Paste" it to the Projects Folder as shown above. Repeat the same process if you wish to replace the default
card3.png graphic with your own custom card3.png graphic.

Here we go.... Press "Apply" in Create Mode

Keep doing this last process with corrections if you want to change the Titles or Wording in the card3.xml
file you made. SImply, edit then copy & paste it into the projects, again. Press
Apply.

After a test, you may need to click the Red X on the Flash Card (top right) if needed.

Now jump back on the Yellow Dot and see the changes.  

Confused?  Hey, this is supposed to be fun! Give it a good
try but, don't rack your head agains the wall.


Just drop me a PM and I will respond as soon as possible. 

Many times I will answer the same day.  Send me a message. 
I  do answer messages and I am here. . .

~Enjoy


You may also find handy the  " Creator's Helping Hands" It makes the avatar Stand Still for photos, etc. 

     ENJOY  
                           
                  
 Make Avatars Stand Still

Note: Graphics are Granted Use License for *this* project only. As always, if you have questions or need help, I am here.            

 
Presenting the
Storybook Theater

https://userimages-akm.imvu.com/userdata/42/15/35/30/userpics/Snap_IgDKWWLaR2797443876.png
presented by

Goldilocks & Lestat