Is it hot in here, or is it just me? Well it *COULD* be you, if you have on the Fire Hair. This simple accessory lights your head ON FIRE! The flames will tightly fit the Default Male Avie's head and Hair, although your mileage may vary on other Hair-Styles and Custom Heads. No matter what you choose to wear with it, you'll be ON FIRE and BURNING UP the scene. Hey, when you're hot, you're HOT!
Commands:
"Burn" - Turns the Fire ON
"NoBurn" - Turns the Fire OFF
PLEASE NOTE: The Fire Hair does NOT remove your existing hair, but is instead designed to work with whatever hair you currently have one. If you want to only have the Fire Hair on, you'll need a Bald hairstyle added. The Fire Hair replaces Mesh Channel 37. Extremely few items in IMVU replace that channel, but if you happen to have one on, it will replace that item, or be replaced itself. The Fire Hair is designed specifically for the Default Female avie's head. It also can be used with other Custom Avie Heads, but I can't guarantee the fit. To ensure your satisfaction with this product, please use TRY IT before you BUY IT! There will be NO REFUNDS if it doesn't fit your needs.
Prefer Blue Flames over Yellow ones? Maybe some Ghostly smoke instead? And how about some SOUND EFFECTS?! Well then, get to work and DERIVE it! Make your own version, and even sell it the catalog for a small markup over my original, and keep the extra profits for yourself! You can express yourself AND earn credits at the same time. How's that for a sweet deal? You'll need a full account on IMVU, as well as a copy of Previewer. You can find out more about Deriving on the IMVU's Education Center. Here are the templates you'll need below:
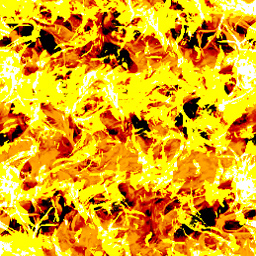
This is the Texture map for the Surface Flames, which hug the surface of the head. This is a "Scrolling" animation, which means that it moves continuously in one direction. In this case, it moves up. The model only uses a small part of it, allowing the surface to appear to be always changing. This image is best used for simple changes, such as color:
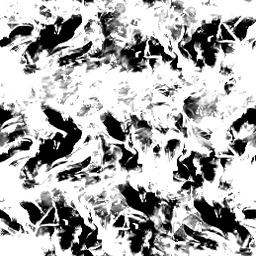
This is the Opacity layer for the Surface Flames. An Opacity layer is a black and white silhouette copy of the Texture map used to define what parts of the Texture map appear and don't appear. The White parts are solid, and the Black are invisible. Any Gray sections are semi-transparent, like glass. Because of IMVU's issues with transparency, I've used an extremely contrasting image, where Whites are very pronounced and blacks are very dark. If you play on making your own custom Surface Fire, I would suggest you likewise use strong contrast to avoid graphical issues, such as the head disappearing, or the Flame Jets being distorted:
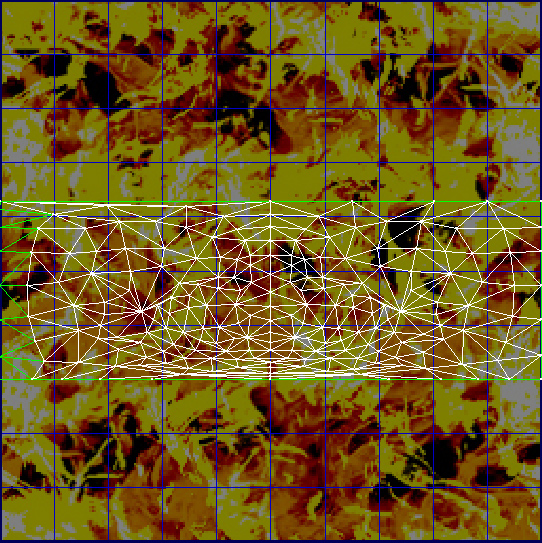
This is the Wireframe layout for the Surface Flames. This shows you exactly how the Texture map attaches to the model. As mentioned above, only a section of the Surface Flame Texture is shown at a time, to give the Surface a more dynamic appearance. The center of the image is the center of the Avie's nose, and the left and right edges are the back of their head. If you wish to make a completely new Texture map from scratch, this image will be very handy. If you do make a new image though, make certain that the Top/Bottom and Right/Left edges match, otherwise you'll see a nasty dividing line on the back and one sweeping up through the image every few seconds. A good way to do this is to cut your image in half, and move switch sides of each half, then paint over the line you see in the middle. Do this Vertically and Horizontally, and your texture map should tile perfectly, with no ugly lines:
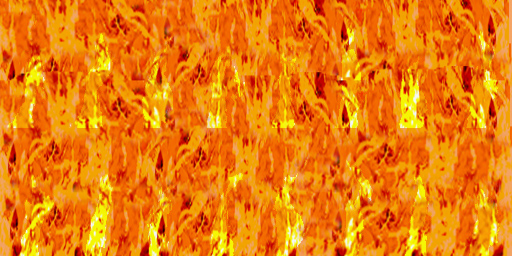
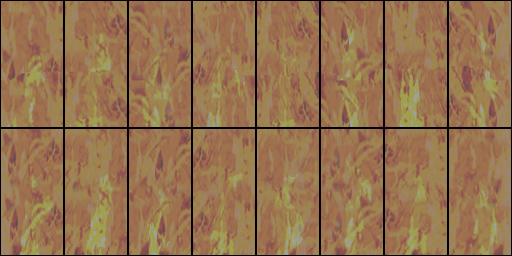
This is the Texture map used for the Flame Jets. This is an "Cycling" animated image, meaning that it's divided into pieces, which are shown in sequence. In this case it's 8 sections across, and in 2 rows. That's a total of 16 frames. Use this image to make simple changes to the Fire, such as Color. If you wish to your own flame animation from scratch, please visit the IMVU Eduction Center for information on how to make an Animated Sequence. You'll also need to make a new Opacity layer to make the shape of your new fire design:
There is an Opacity layer, but I haven't included here for copy-right reasons. You are unlikely to need to modify the Opacity layer, unless you wish to change the shape of the flames. If you do wish to make new flames, make certain the Opacity layer matches the size and layout of your new Flame Jet Texture map.
This is an example of the animation setup for the Flame Jets. IMVU cycles through each of those boxes of space, left to right on through the top, then it jumps down, and goes left to right through the bottom set. Then it resets back up to the top-left. If you wish to make a new fire sequence, just put each of your frames of animation into each of the boxes, then paint over the boxes. For instance, if you were to use a video of an actual fire, like I did, reduce the video down to just 16 frames, or about 1/2 a second of video. The cut and past each frame even into my frame animation. Make certain that none of your image touches any of those edges, because if you do, part of one frame will bleed into the next and graphical glitches will appear. Save the Image as a JPEG Texture map, then make a copy of that Texture map. Paint over all of the parts of your image that aren't the fire with black, and everything else as white. Save that as a JPEG and you'll have your Opacity layer:
To add sound, I highly recommend you download and use Audacity. It's a free sound editing tool that can export out OGG sound files. OGG sound files compress down to less then 1/10th the file size of WAV files. SO USE OGG FILES!!! You can download it here:
http://audacity.sourceforge.net/
Please keep your sound volume levels within acceptable limits. DON'T MAKE YOUR SOUND AS LOUD AS POSSIBLE!!! Loud sounds will annoy other users, and reduce your sales. Also avoid using Looping sounds, as IMVU has no controls to stop Looping sounds once they start playing.