How To Make Product Page Easily (Tutorial)
Due to messages that I get from users, I will show you how to make own
Product Page, easily and without knowing anything about coding.
Some time ago I made a tool which you can use for FREE directly from here: http://www.imvu.com/shop/product.php?products_id=19777222
You will be able to set visual background, images, links, colorful text and
make your pages nice looking for others.
Also, Interactive Preview (26) area will allow you to edit like in standard text editors.
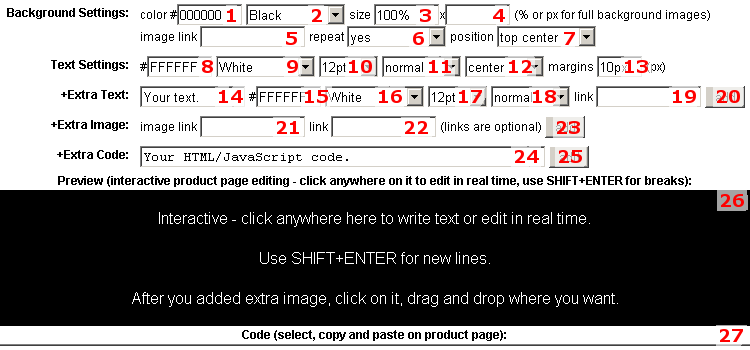
Background
1 - (optional) Set a color of main background. You can use any color using
standard HTML codes. Codes can be found easily over internet. If you dont want
to waste time on searching codes, you can just go to next option (2).
2 - Some standard colors for main backgroundto choose. Lets choose one (Gray for
example) and see how Interactive Preview (26) changes its background.
3 - (optional) Set a width of Product Page at percent (example: 100%) or pixels
(example: 100px). I suggest to leave it as 100%, so all the page will be used.
4 - (optional) Set a height of Product Page at percent (example: 100%) or pixels
(example: 1000px). I suggest to leave it blank, so it will be as long as all the
content inside.
5 - (optional) Set image from link as background Its good to use some seamless
(loops correctly from all sides) image. Also, content should be readable, so use
darker images for bright text. Decreasing background contrast is also good
practice too. I suggest to keep background images at IMVU albums (example: http://userimages-akm.imvu.com/userdata/48/92/36/09/userpics/bg_0.jpg),
coz I see many pages using external image servers which links no more exist (now
think about changing all your pages with new correct image links - have a nice
work).
6 - (optional) Set image repeat (vertical for example). Yes for seamless (loop
images), no for no repeat, horizontal for left and right repeat, and vertical
for top and bottom repeat.
7 - (optional) Set position of background image (top left for example).
Text
8 - (optional) Set default color of text using standard HTML codes. You can use
some prepared ones from next option (9).
9 - Some standard colors for default color of text. Lets choose one (Silver for
example) and see how Interactive Preview (26) changes its text color.
10 - Set default font size of text. Its recommended to use 10pt or 12pt.
11 - Set default font style of text. Normal for standard, bold for thicker,
italic for cursive, both for bold and italic at once. Its recommended to leave
it normal.
12 - Set default position of text. Center, left, right or justify. I prefer to
use center.
13 - Set page margins in pixels (10px for example, will separate content with 10
pixels from all sides)..
14 - (optional) Set new text block with its own settings. You can use this area
with all its options (14-19) to put new text, or use Interactive Preview (26) to
write easily using default settings (like in real text editor, just click on
Interactive Preview and start editing/removing/writing).
15 - (optional) Set own color for text block using standard HTML codes.
16 - (optional) Some standard colors for color of text block.
17 - (optional) Set own font size for text block.
18 - (optional) Set own font style for text block. Normal for standard, bold for
thicker, italic for cursive, both for bold and italic at once.
19 - (optional) Set a link for text block. This is a way how you can add links
to your text (example: http://www.imvu.com/shop/product.php?products_id=19777222).
20 - (add) This button adds our new text block.
Lets try some work with text. Click on first example line of text in Interactive
Preview area (Interactive - click anywhere here to write text or edit in real
time), remove and add some text like you would do in standard text editor. Yes,
you can edit your content on the fly. Same way you can also edit other blocks
with its own text settings (color for example). Most browsers should allow you
to work on selecting text and use cut, copy and paste shortcuts as well. For new
lines, use keys SHIFT+ENTER (hold SHIFT and press ENTER).
Now, time to add some different text block. Lets do example and write text like
THIS IS MY RED LINK (at 14), choose red color setting (at 16), choose bold
setting (at 18), paste some link like http://imvu.com/ (at 19) and click add
button to submit (20).
As we can see, there is a new text in Interactive Preview (26). Its thick, red
color and work as link to main imvu website. When we click on it, we can edit
this text (THIS IS MY RED AND MODIFIED LINK for example). We can do more. We can
also change its position. Select all this new text, use CTRL+X (cut shortcut),
click somewhere between rest of the text where you want to place this link and
use CTRL+V (paste shortcut)
Now you know how to work with your text. There is no need to use all of the
options, but might be useful for more advanced look from your head.
Images
21 - (optional) Set image from link (example: http://userimages03-akm.imvu.com/productdata/images_1b3d752958c56172c97ed7b259b28c09.png).
22 - (optional) Set image as link (example: http://www.imvu.com/shop/product.php?products_id=19777222).
23 - (add) This button adds our new image.
Lets try some work with images. Use image link to one of your icon (at 21),
paste a link to your product (at 22)and click button to submit (20).
As we can see, there is a new image in Interactive Preview (26). Its your icon
which is a link to your product. If you want to move it to other place, you can
try drag and drop (it may work in some advanced browsers) or click on image, cut
(CTRL+X), click where and paste (CTRL+V).
Code
You can add extra HTML or JavaScript codes (at 24, and using 25 button) if
needed.
After Interactive Preview look good enough to use on your Product Page, select
it (from 27 area), copy (CTRL+C) and paste (CTRL+V) in your Product Page
description.
Note that its FREE tool for people who wants to make nice and simple Product
Page without much knowledge about codes, so dont expect advanced features.
If you have questions, feel free to send me a message.