|
Step By Step Tutorial is Below
Optimized Anti-Crash
LOW KB
Low KBs helps everyone Reduce Crashing!
Most Important - There is MORE Kb Space for yoour project!
Make Your OWN Voice Box
Derivable & Tutorial with Technical Support
Please read the entire page. Do not use this content
for anything other than deriving this product
This is a derivable Voice Box WORKS
with Male or Female Avatars
*Male or *Female inventory versions available
( * Where you find it on the client)
Decide before you derive if the product you are making will be "mostly" for Male or Female Avatars
Pick the one (above) that is best suited for the "Male Inventory" or "Female Inventory"
This is only a convenience choice for your customer
YES !!! It works with *ALL* Avatars
It is the Best voice Box to use because it Won't Fall Off when you Add other clothing
items to your avatar. Has your voice ever 'fallen off' when adding a ring, carrying a tool
box, wearing gloves, earrings, piercing Jewelry or eye glasses????
This is what I am talking about. . .
This voice box is almost bullet proof. It will not come off unless you take it off!!!
It is Specially Attached this Voice Box to the Avatar to prevent this at all costs.
The original product *was* from Sun Glasses the body attachment has been altered
from the Head attachment to a permanent bone attachment!
This one is VERY Low KB to help prevent crashing and to allow
you top add MORE Sound Content to your product !!! :D
voice box tutorial teach teacher derive derivable sound sounds voices voicebox voice box tutorial for creators dub dube step dj effects
So ...
How do you do it, Lestat?
Tutorial Below
THIS ITEM IS FOR CREATORS ONLY
PLEASE DON'T PURCHASE THIS ONE
SORRY NO REFUNDS
Your favorite creator can customize this one for you. Please don't buy this
one unless you like what you see in the Shop Client 'Try IT" Room
More of my DERIVABLE Products HERE:
Try It first, No Refunds...

Creator's Notes
|
Creator's Notes & Tips:
|
|
|
Getting Ready and Familiar with AudaCity Software
|
-
Quickly, getting past some common recording problems. If you cannot record from your Microphone, go to the Windows Control Panel. Go to Start then Run type in CONTROL press Ok. Look for an Icon that says Sounds. Poke around in there and find a place that takes you to Advanced Recording Settings. You want the Microphone on and the Stereo Mix on. If you see a place for Boost Microphone or Enhance Microphone, turn that on too... Some Audio Hardware provide tool for these settings. Realtek and C-Media Both have them. Play around and get things working then lets go on to the AudaCity Software.
-
Open AudaCity Software. Notice at the Top Center there are 2 volume controls and an Input Selection Choice. Set the Pull down there either on Stereo Mix (what you hear out of your speakers) or the Microphone. The two volume controls are to adjust how much volume goes into the recording. Speak in to the Microphone and Press Record. We will use the microphone input for the example. The Stereo Mix Input is the same. Speak into the Microphone and watch the Sound Level Gauge spike upward as the sounds get louder. Look closely at the level indicator. It should never touch the zero. Ideally it would only hit the -1dB and never the zero. So adjust you voice volume to make even sounds as best as possible. This will give you the cleanest sound possible so your product be excellent! Note: If you are recording from another source use the Mixer Volume to control the sound levels the same way.
-
After you have Sound 'Tracks' Recorded, you can Edit them. Add effects and enhance them with the Effects Pull Down Menu. Add so reverb to your voice, etc. The last thing you would want to do once you get a sound track complete is to Normalize the track. this is so all the tracks will be at about the same level. PLAY with the AudaCity Program. this is what makes your Voice Box GOOD! Increase your skill with the software and have much better products. If you get really good at this and want to go further. You may want to invest in a Professional Recording Package. They will give you many more features.
-
-
Preparing the sound tracks for IMVU - 'Save' each one in this method. IMVU cannot use any file type except the .OGG. You cannot just SaveAs .OGG You must export them. If you have saved them as a project or whatever, open them back up into AudaCity and Export them to .OGG files. Go to File then Export .OGG Pick a place you can find them again and press Export.
|
|
Already have your .OGG files ready?
Start HERE:
-
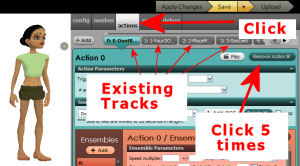
Once the Create Mode has opened up. Notice the ACTIONS tab. Click It. Notice there are NO .OGG files already on the Voice Box. Change the Trigger on the first one from Voice to your, trigger name. Add the .OGG file as in the below shown in #2. Press Apply and then Play. Does it work? After you have the first one in place you simply press the 1 ADD Button and we can get started on the second. Read on...
-
We have 5 easy steps to follow with each sound track. We enter each sound track one at a time and test each one as we go. LOL See the step two on the graphic. Type in your Trigger word with no spaces. Keep the simple as in Numers and Characters. Only Numbers and Letters to start with. After you make your first one, play with some of the punctuation characters to see how they act in the client.

-
Click 2 Add .OGG File Browse to the folder you stored them in. Double Click one of them. I usually start at the top of the list and work down.
-
Click in the 3 Trigger box. Type over the VOICE trigger I placed there. Type a Name for your trigger. Keep them as short as you can. Use only Numbers and Letters. NO SPACES . These are the Words you see on the Avatar when you click it in the Chat. So think about that when you name them. The first characters of the Trigger Word tell the client how to sort them alphabetically. If you have role play sets of triggers then you may want to number them.
-
Click on the 4 Apply Button. Now press 5 the Play Button... What cha got? If it is working go to the next one. Follow the steps... 1, 2, 3, 4, 5 Repeat this for all of your tracks. Dont fill in anything extra on the forms. Only what I have told you about. This will get your voice box going as soon as possible.
-
When all done. Press the Save Button at the top. Press the Upload to IMVU Button and your off to the catalog! When the Blue Submit form comes up, look on the Right Side and Click each step 1 through 8. It will guide you through it.
-
If you need a 80x100 Icon , you may Right Click Copy and Paste it to your desktop. tell the submit form where it is on your computer - Enjoy-
-

|
As always, if you have questions or need help, I am here
Just drop me a PM I will respond as soon as possible.
|
|