
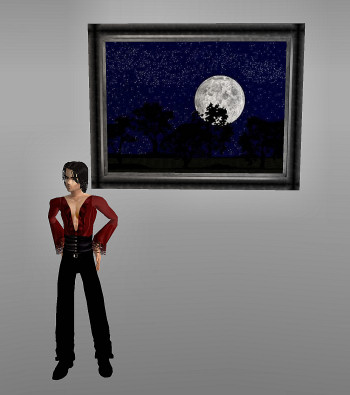
Photo Gallery Wide
New Improved Version is HERE:
Derivable With or Without Frame
An excellent, light weight WIDE picture frame designed specifically to fit the
Wide Photo Gallery Photos from IMVU for Creators making custom frames
If you like the Moon Photo it makes a nice addition to most rooms, too!
It of course works for all other Wide Pictures but this will fit "Pixel to Pixel"
Photos from the IMVU Gallery.
Developers, please resize your photos to 512 Wide for maximum resolution. Keep in mind this will make the Wall hanging much more heavy. If you can still make a nice looking photo 256 pixels wide, then this will save a lot in Room Weight. TUTURIAL is BELOW
More Photo Frames Here:
![]() first in the Client Shop Window
first in the Client Shop Window
Many more choices are available.
More Choices HERE:
Creator's Notes
&
UV Maps Below

|
Weddings Music Ambiance |
Candlelight Dinner for Two |
Wedding Priest & Vows |
|||
 |
 |
 |
More Wedding Items
Creator's Notes & Tips:
Graphics!!!
I have used small sized graphics for the excellently LOW Kb to help reduce overall client crashing.
This also leaves you plenty of Kb Room to add your wonderful artwork and still have a light weight product.
Please note, if your color combinations are not working, adjust the Vertex On or Off as needed.
You can also adjust the "Self Illumination". Experimetn with these settings.
You may use any size graphic you wish. If you need more detail use a Larger Graphic 256x256 or 512x256, etc. This
project may use Mapped (below) and / or Standard graphics in a 128x128 (low Res/Kb), 256x256 (normal Res/Kb) and up to 512x512 (High Res/Kb) Look closely at my "starter" textures in the Create Mode to get an idea of their layout, sizes, more... Experiment!
Most all textures are 'standard' (as in the preview pane of Create Mode except for any UV Mapped as in the below) Change as many textures as you want. I suggest you make yours unique!
Can you use my textures on my products? YES!
Can you use my textures on other products? No.
TUTORIAL
One quick and very important point about 'WHY' to derive this one? . . .
Look at it in the Shop Window, use the Try It Button . . .
Isn't it much better to have your artwork displayed immediately in an natural display view of the customer?
Why place your artwork on the floor? LOL Yeah this one Rocks...
1) Make sure you use the correct derive for Tall Pictures or WideTall Pictures. I have both in the catalog. I also have a Fancy Framed set for you to use, also. Anyway, Go to the bottom of this page and look for a Big Red Number. Notice to the right of that it says "Derive from Product" Click it. This will automatically open up the Create Mode for us and have this Picture Frame ready to go! But we need a Picture....
Other Derivable Frames are Here... HTTP://TinyURL.com/Lestat-PictureFrame
2) For the Tutorial purposes we are going to use a 'Snap Shot Picture' from your IMVU Photo Gallery. Go to your IMVU Gallery. Pick out a photo that is as Clear as Possible. Usually a close up shot works best. These are not the best resolution for a Wall Art but you will get the Idea. Find one and "DISPLAY in the BROWSER. (over to the Left Side) Click that , the browser window will open up for you. Right Click on top of your image, look for an option in the menu that says "Save Image As" or Save "Picture As" and click on it. Now guide the Windows to save it on your Desktop or a place you can easily find it.
THAT was the HARDEST PART For those that understand you may also use a picture from your My Pictures But it MUST be resized down to 512 Tall or smaller for IMVU to accept it. If you don't understand, just skip that for now. :)
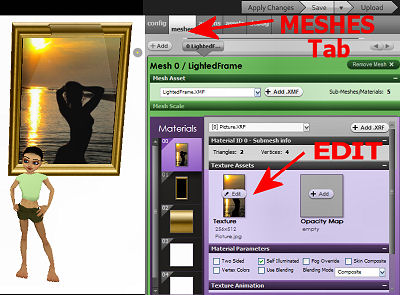
3) Look at the Create Mode Screen. You will see the MESHES Tab open. It has a list of Materials there too. We are only going to Practice with the First Material. It is easy to find - it is the Main Part. The Moon will be replaced by your image. We want to Click EDIT the Top most Material called Material Zero. We are not really going to Edit - Edit it - as in a Graphics Editor But we are EDITing the Project and 'Adding' yours in place of it.
Press the EDIT button as shown if you haven't already and Find the Picture you saved to your Windows Desktop. Double Click on IT !! Nothing Much happens yet, keep going.
These example pictures are a little different than this project. IT is ok. Ours is more simple it has the Main picture as Material 0 and the Frame Picture as Material 1. You may leave my framework on Material 1 if you want it or simply add another 512 pixels Tall image of say "Wood" or some Metal it will look good too. . .
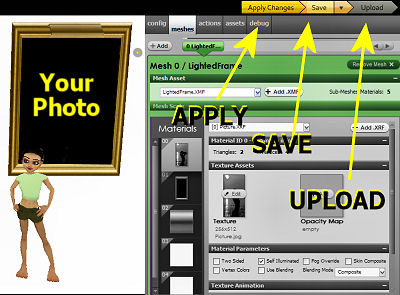
4) Look in the picture below and press APPLY. Now you should see your Photo! You guessed it, Press SAVE and then Upload. Your Project is on its way to IMVU. Almost done... In a few moments the Blue Submission Page will come up. First, look on the right column there. See the Steps 1 through 8 ? the First one is up there and Explains what to do and the appropriate Box is Highlighted to change.
Click on the Right Side where it says Step 2 and it will guide you through all 8 Steps. Make sure your photo does not contain any AP products unless you select the Access Pass Audience when you submit. Keep reading. :) I can have my derivers getting in trouble now can I - LOL
Once you are happy with your description and the way the catalog entry looks, go ahead and press the Big Red Submit button... You can edit the description by going to the bottom of your project catalog page and select edit settings.
ADVANCED Information :
If you press something wrong or things don't look right, You may simply X-Out of the whole thing and start over. Some of the settings on Material Properties and the Opacity maps are used for different things. Changing the Illumination for example is helpful in special light conditions. Fog override - does just that. In a room that has a lot of FOG in it, the selected material will show through it. BUT Leave these alone until you get more practice. Your done!
HOW TO REMOVE THE Frame on Material 01 ?
It is pretty easy to remove any thing that you don't want to show in many projects. We are going to learn how. Some people may not want the frame on the painting but want it to look more like a wall "Poster" (no frame) This is so EASY. Find the material marked Material 01 . look to the Right of that and see "Opacity Map" image. This is 'usually' left 'empty' but, add an 8x8 Black Square by clicking Edit on that part. You can make the 8x8 solid Black from your graphic editor. Press Apply.
Now you know a bit about how Opacities work :D
If you have questions or get stuck drop me a private message. Now that you are an official creator,
please consider joining a good question and answer group for support.
You may also find handy the " Creator's Helping Hands" It makes the avatar Stand Still for photos, etc.
ENJOY
Make Avatars Stand Still
Note: Graphics are Granted Use License for *this* project only. As always, if you have questions or need help, I am here.
Presenting the
Storybook Theater

presented by
Goldilocks & Lestat